During certain years, it can seem like winter blends into summer with no spring in sight. Frigid temperatures can be quickly followed by very warm weather and vice versa. It may seem like there isn’t much time to carry out essential tasks to get ready for the heating or cooling season ahead. Getting ready for a hot summer is vital if you want to have an adequate level of indoor comfort, but some people don’t take the time to prepare their AC systems and turn them on correctly. If you want to get the best cooling performance from your equipment and enjoy the benefits of energy efficiency, it’s important to follow these simple steps before you turn it on again.
5 Common AC System Terms
Before we get started, let’s take a look at some of the terminology that you will hear from HVAC professionals and in this brief guide.
- Air Conditioning: This is control of the indoor temperature in your home, the management of humidity levels, and the removal of moisture or condensation.
- The Compressor: This is an air conditioning component that changes the refrigerant pressure from low to high.
- The Condenser: This component looks like a radiator; it’s where the refrigerant disperses the heat that has been collected from inside the home.
- The Evaporator: This component changes the state of the liquid refrigerant to a gas as heat is absorbed from the indoor air.
- The Filter: This is a component that is used with the drier, or it may be located on a separate unit. The filter removes foreign materials to protect the other sensitive components in the AC system, and the layers may be installed in series.
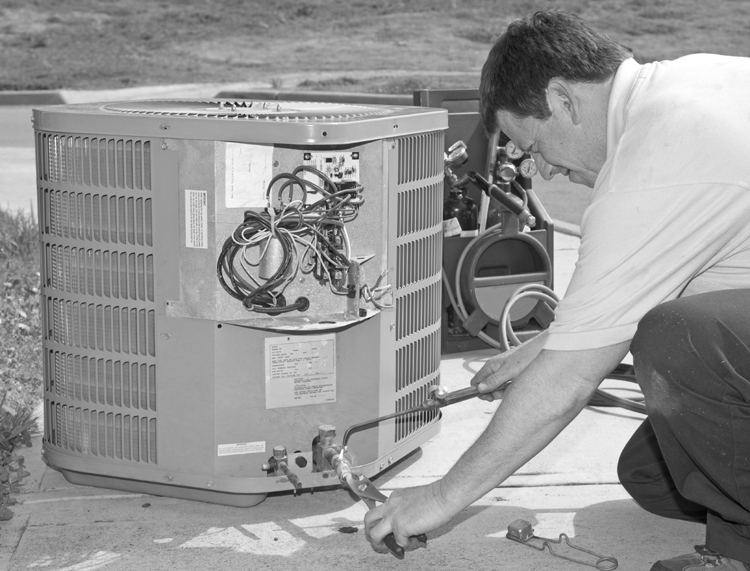
Further to these terms, it’s useful to know that air conditioning can broadly be divided into indoor and outdoor equipment. It’s a great idea to get your HVAC equipment serviced by a qualified, certified technician before the start of each cooling and heating system. This can avoid that nervous time when you turn on your equipment for the first time in months with your fingers crossed and hoping that it works. It is possible to visually inspect certain parts of your HVAC equipment yourself as we will demonstrate below, but it’s not a good idea to work on this equipment without formal training. It’s dangerous, and you could easily turn a minor issue into a more extensive problem that’s far more expensive to fix. Let’s take a look at how you can prepare your AC system before you turn it back on.
7 Steps to Prepare Indoor AC Equipment
- Turn your thermostat to the “Off” position and make sure that the temperature to a higher setting (around 80º is fine) and then check the following steps.
- Take a close look at your thermostat, is it in good shape, or does it look outdated and unreliable. If you have an older thermostat switching to a newer programmable or smart thermostat could save you time, money, and energy.
- Go through your home and check any sections of exposed ductwork for obvious signs of wear and tear. Any gaps or cracks in your ducts can lead to a loss of air, and this will affect your cooling performance and energy efficiency.
- Check every air vent in your home to ensure that there are no items or pieces of furniture that are blocking the vents to reduce airflow.
- Examine the condensate or drain line at the indoor cooling coil to ensure that it’s clean, clear of blockages, and ready for use. If a drain line becomes clogged, it can result in localized flooding and associated water damage. The drain line should be cleaned by an HVAC technician once per year, and this is included as part of a comprehensive service. Flushing the drain with a cup of chlorine bleach and rinsing with a gallon of water should be sufficient to keep the drain clear during the summer months.
- Check the air filter, it should be changed at least every three months, but you may as well put a new air filter in as a matter of course.
- Check all of your circuit breakers to ensure that the electrical connections are on and ready for use.
4 Steps to Prepare Outdoor AC Equipment
- Check your outdoor condenser unit to make sure that there are no items or blockages surrounding the equipment. Any plant growth should be trimmed back, and any tools or garden furniture should be moved away. Give the area around the unit a good clean because any blockages can affect the performance of your equipment.
- Take a look at the refrigerant lines, they should be insulated, and there should be no signs of leaks. If there are any breaks in the insulation, they should be repaired by an HVAC technician to improve the efficiency of the AC system.
- Examine the electrical wiring, check for signs of wear or damage, and call a professional if you see anything suspect.
- Evaluate your cooling equipment, an average AC system can least 10-15 years depending on how well it’s maintained, and older systems are less energy efficient. If you’re not sure, contact an HVAC professional and get them to assess your AC system for you. If you switch to a newer and more energy efficient AC system you could save as much as 20-40% on your cooling costs this summer.
3 Steps to Turn on Your AC System
- Now that you’ve checked the indoor and outdoor equipment, it’s time to turn the AC system on and check that it’s working correctly.
- Turn your thermostat to the desired temperature level and select the “On” setting. Go to the outdoor unit, listen to the equipment, and you should hear the condenser running, and the fan spins freely. The air coming from the top of the unit should feel warm, and this is the heat being removed from your home.
- Leave the AC system running for 10-15 minutes to see how it cools your home. If everything seems to be working fine, congratulations, your AC system is working.