Keeping your home comfortable and your energy bills in check often comes down to one overlooked component: the evaporator coil. If you’ve ever wondered why your air conditioner seems to struggle on a hot afternoon or why your utility bill shot up without explanation, “cleaning evap coil” might be the answer. In this guide, we’ll walk through everything you need to know—what the evaporator coil does, why regular cleaning matters, how to spot trouble, and step-by-step instructions for tackling the job yourself. By the end, you’ll be armed with practical tips and insider advice from Around the Clock Heating and Air Conditioning to keep your system running smoothly all season long.
What Is an Evaporator Coil?
Your evaporator coil is essentially the heart of the indoor portion of your A/C system. Housed inside the air handler or furnace, it consists of a network of thin metal fins wrapped around refrigerant tubing. As warm air from your home blows over these cold fins, the refrigerant inside absorbs heat and changes from liquid to gas. That cooling effect is then circulated through your ductwork, delivering the refreshing breeze you feel each time you step inside after a scorching day.
Quick analogy: Think of the evaporator coil like the ice in your favorite beverage. Just as ice soaks up heat to keep your drink cold, the coil soaks up warmth from indoor air so your home stays comfortable.
How Evaporator Coils Work
Air moves over the coil’s surface, and as the refrigerant evaporates, it draws thermal energy away from the air, lowering its temperature. That chilled air then flows through your ventilation system and into living spaces. Without a properly functioning coil, this heat exchange process becomes inefficient, leading to longer run times, uneven temperatures, and higher energy use.
Role in the Cooling Cycle
In the four-step refrigeration cycle—compress, condense, expand, and evaporate—the evaporator coil handles the final “evaporate” stage. It’s where the refrigerant completes its job by transforming from liquid back into gas, all while stripping heat from your indoor air. A clean, well-maintained coil maximizes this exchange; a dirty coil, by contrast, slows it down significantly.
Why Cleaning Your Evaporator Coil Matters
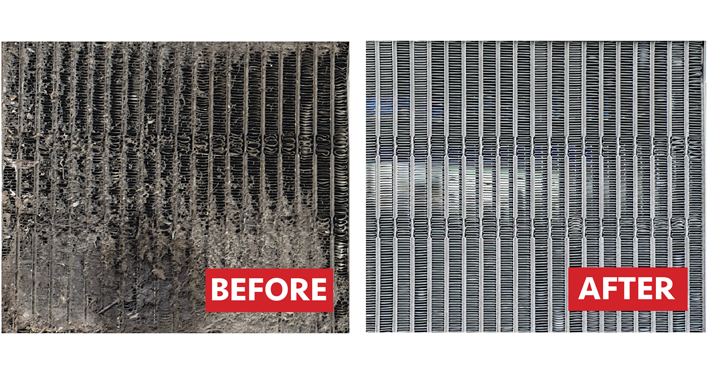
Over months of operation, it’s normal for a thin layer of dust, pet hair, and even microbial growth to accumulate on the coil’s surface. Left unchecked, that buildup acts like insulation, impeding heat transfer and forcing your A/C to work overtime. Here’s why regular “cleaning evap coil” should be a non-negotiable part of your home maintenance routine:
Energy Efficiency and Cost Savings
Dirty coils make your system run longer to reach the same set temperature—often by as much as 20–30%. In real terms, that can translate into tens or even hundreds of dollars extra on your electricity bill each summer. By contrast, a clean coil allows heat to move freely, so your compressor cycles on and off less frequently. Many of our customers report immediate energy savings after a professional coil cleaning or following our DIY steps carefully.
Indoor Air Quality and Health
A buildup of dust and organic material on the coil creates an ideal breeding ground for mold and bacteria. Each time your system runs, those spores and allergens can be distributed throughout your home—exacerbating allergies, asthma, and general discomfort. A thorough cleaning not only restores cooling power but also helps ensure the air you breathe is fresh and healthy.
System Longevity and Reliability
When your A/C doesn’t have to fight through layers of grime, critical components like the compressor and blower motor experience less stress. That means fewer breakdowns, lower repair bills, and an extended overall lifespan. In our experience at Around the Clock Heating and Air Conditioning, customers who commit to annual coil cleaning avoid many of the premature replacements we see in systems deprived of proper care.
Signs Your Coil Needs Cleaning
Knowing when to tackle coil cleaning can save you from guessing games and unexpected disappointments. Watch for these tell-tale indicators:
- Visible Buildup: If you remove the access panel and see a noticeable layer of dust or lint clinging to the fins, it’s time to act.
- Reduced Airflow: Weakened airflow at vents—especially if you’ve ruled out a clogged filter—often points to a dirty evaporator coil.
- Longer Cooling Cycles: If your A/C runs for extended periods without reaching setpoint, the coil may be insulating your refrigerant.
- Unusual Noises or Smells: Gurgling, hissing, or musty odors during operation can signal moisture-driven microbial growth on the coil surface.
- Ice Formation: In extreme cases, a dirty coil can lead to secondary freeze-ups, where moisture trapped on the fins turns to ice and blocks airflow entirely.
How Often Should You Clean Your Evaporator Coil?
As a rule of thumb, inspect and clean your coil at least once a year—ideally in spring, before peak cooling season. However, you might need to adjust that frequency based on:
- Pet Owners: Homes with shedding dogs or cats often collect hair in the system faster, suggesting biannual cleanings.
- High Dust Environments: If your neighborhood is particularly dusty or you have ongoing construction nearby, consider quarterly checks.
- Allergy Sufferers: Extra cleanings can help minimize airborne irritants during back-to-school and spring allergy seasons.
- Heavy A/C Use: If your system runs almost nonstop in a hot climate, more frequent cleaning prevents performance degradation.
Need a reminder? Bookmark our maintenance specials at A/C Repairs & Maintenance and schedule your next tune-up now.
Step-by-Step Guide to Cleaning Your Evaporator Coil
Whether you’re a hands-on DIYer or simply want to understand the process before calling a pro, here’s how to safely and effectively clean your evaporator coil.
Preparation and Safety
- Power Down: Turn off the A/C at the breaker panel. Never work on HVAC components with live power.
- Protective Gear: Gloves, safety goggles, and a dust mask will keep you safe from debris and cleaning chemicals.
- Gather Tools: You’ll need a soft-bristle brush, an HVAC-approved coil cleaner (foam or spray), a gentle water source (spray bottle or low-pressure hose), and a fin comb for bent fins.
DIY Cleaning Steps
- Remove Access Panel: Locate and unscrew the panel on your air handler to expose the evaporator coil.
- Brush Light Debris: Gently loosen surface dust with your soft-bristle brush. Avoid bending fins.
- Apply Coil Cleaner: Liberally spray the foam cleaner across the coil surface. Let it sit for the manufacturer’s recommended dwell time (usually 5–10 minutes) to break down grime.
- Rinse Carefully: Using a low-pressure spray, rinse the coil top-to-bottom, allowing cleaner and debris to drain away. Do not flood electrical components.
- Straighten Fins: If you spot any bent fins, a fin comb can straighten them out, restoring proper airflow.
- Reassemble and Test: Replace the access panel, restore power, and run your A/C through a complete cooling cycle to verify strong airflow and stable temperatures.
Pro Tip: If you still experience frost or ice buildup after cleaning, check out our detailed troubleshooting article on How to Fix a Frozen AC Unit for advanced solutions.
Common Mistakes to Avoid
Even well-meaning DIY enthusiasts can slip up. Watch out for these pitfalls:
- Using Household Cleaners: Laundry detergents or kitchen degreasers can leave sticky residues and corrode metal. Stick to HVAC-rated solutions.
- High-Pressure Washers: A concentrated jet can bend vulnerable fins or force water into sensitive areas.
- Skipping Power Shutoff: Working on live components is a recipe for electrical shock or equipment damage.
- Neglecting Professional Checkups: DIY coil cleaning is helpful, but only a certified technician can verify refrigerant levels, electrical integrity, and overall system health.
Professional Maintenance and Additional Tips
For most homeowners, pairing DIY coil cleaning with an annual professional inspection strikes the best balance between cost and performance peace of mind. Our Around the Clock certified technicians will:
- Deep-clean both evaporator and condenser coils
- Check refrigerant charge and seal potential leaks
- Inspect electrical connections, contactors, and capacitors
- Test airflow, blower performance, and airflow balance
- Calibrate thermostats, including smart controls like the ComfortSense 7000 thermostat
Explore our full suite of services at A/C Services or upgrade to personalized comfort with Zoning Systems.
Other HVAC Maintenance to Consider
- Air Filter Replacement: Swap filters every 1–3 months to prevent dust buildup on coils and protect indoor air quality.
- Condensate Drain Cleaning: Clear drain lines to avoid water backups and potential mold growth.
- Duct Inspection & Sealing: Properly sealed and insulated ducts minimize energy losses and maintain balanced airflow.
- Air Handler & Heat Pump Tune-Ups: Annual servicing of all indoor components ensures smooth operation year-round.
Further Reading from Lennox
For more in-depth technical background, check out these high-authority resources from Lennox:
- Lennox Air Conditioner Maintenance Tips
- Understanding Evaporator Coils in HVAC Systems
- Is an AC Tune-Up Worth It?
Ready for Peak Performance?
A sparkling clean evaporator coil is the unsung hero of efficient, reliable cooling. Whether you tackle “cleaning evap coil” yourself or lean on our expert team, make this maintenance step a non-negotiable tradition each season.
Contact Around the Clock Heating and Air Conditioning today for a comprehensive system tune-up or professional coil cleaning—no surprises, just honest service.
➡️ Get your free estimate now!
Frequently Asked Questions About Cleaning Your Evaporator Coil
How often should I clean my evaporator coil?
Ideally, you should inspect and clean your evaporator coil once a year before the cooling season begins. Homes with pets, high dust, or heavy A/C use may benefit from twice-annual cleanings.
What are the most common signs that my coil needs cleaning?
Look for reduced airflow at the vents, longer cooling cycles, musty odors when the A/C runs, or visible dust and debris on the coil fins. Those red flags usually mean it’s time for a “cleaning evap coil” session.
Can I tackle cleaning my evaporator coil myself?
Absolutely—DIY cleaning is doable if you follow safety steps like cutting power, using an HVAC-approved coil cleaner, and rinsing gently. If you’re uncomfortable or notice refrigerant issues, calling a pro at Around the Clock Heating and Air Conditioning is your best bet.
What tools and supplies do I need for cleaning evap coil?
You’ll need a soft-bristle brush, an HVAC-rated coil cleaner (foam or spray), a low-pressure water source, gloves, goggles, and a fin comb for straightening bent fins. Having everything ready makes the process smooth and efficient.
How long does a typical coil cleaning take?
A straightforward DIY coil cleaning usually takes 30–60 minutes once you have the panel off and tools in hand. Professional technicians can often complete a deeper clean plus a full tune-up in about an hour.
Will regular coil cleaning lower my energy bills?
Yes—clean coils improve heat transfer so your A/C doesn’t run as long or work as hard, often translating to a 10–30% reduction in cooling-season energy use. Over time, those savings really add up.
Which coil cleaner is best for the job?
Always choose a cleaner specifically formulated for HVAC coils—look for non-acid, foaming solutions that dissolve dirt without harming metal fins. Avoid household detergents or harsh chemicals that can leave residue or corrode the coil.
Can a dirty evaporator coil cause strange smells or health issues?
Definitely—moisture on a grimy coil becomes a breeding ground for mold and bacteria, which can emit musty odors and aggravate allergies. Regular “cleaning evap coil” helps keep your indoor air fresh and healthy.
How can I keep my coil cleaner longer?
Change your air filter every 1–3 months, seal and insulate ductwork, and schedule seasonal inspections. Those habits minimize dust buildup and extend the time between deep coil cleans.
What does professional coil cleaning cost?
Pricing varies by region and system size, but you can expect to invest roughly $100–$200 for a thorough coil cleaning and tune-up. Many homeowners find the energy savings and reduced repair bills make it a smart yearly investment.